News:


  • April 19, 2024, 08:13:25 AM

Login with username, password and session length

Author Topic: Bellcranks, leadouts and sleeves  (Read 19356 times)

Offline Jonathan Chivers

  • Trade Count: (0)
  • Ensign
  • **
  • Posts: 47
Bellcranks, leadouts and sleeves
« on: October 14, 2014, 04:04:52 PM »
Hello all,
I am building a plane from a John Miller design and see that John is sleeving the bellcrank with 1/32 brass tubing and then passing the leadout wire through the tubing/bellcrank.

After checking with a number of other plans (all around the 40-60 inch wingspan) I see that most designs use some variation of this approach. I assume this is being done to stop the leadout wires sawing through the bellcrank. Having spent the evening in my man cave, I can report that either I do not have the right tools to do this job, or it is a pan in the butt job (or both).

So here are my questions:
1) If every medium to large control line plane needs to have the bellcrank sleeved in this way, why is nobody selling sleeved bellcranks?
2) Has this a method been made redundant by modern materials (I am using a Brodake bellcrank)?
3) How are other people going about this task?
4) I have thought of cutting a length of tube, say an inch long, cleaning up the ends, passing the leadout through it,  pushing the tube into the bellcrank and then bending the end over. Has this worked for anyone?

Thanks in advance,
Jonathan

Offline rich gorrill

  • 23 supporter
  • Trade Count: (0)
  • Commander
  • *
  • Posts: 392
Re: Bellcranks, leadouts and sleeves
« Reply #1 on: October 14, 2014, 05:15:29 PM »
If you go to the forum section I think Sparky has posted a video that might answer your questions

Rich

Offline RknRusty

  • 2019 supporter
  • Trade Count: (0)
  • Admiral
  • *
  • Posts: 2689
    • My Tube channel
Re: Bellcranks, leadouts and sleeves
« Reply #2 on: October 14, 2014, 05:27:46 PM »
Here's a great tutorial and it's head slapping easy.
http://www.stunthangar.com/uploads/bellcrank%201.pdf
Don't miss step#8 or it won't move as freely as it should.
Hope this helps.
Rusty
DON'T PANIC!
Rusty Knowlton
... and never Ever think about how good you are at something...
while you're doing it!

Jackson Flyers Association (a.k.a. The Wildcat Rangers(C/L))- Fort Jackson, SC
Metrolina Control Line Society (MCLS) - Huntersville, NC - The Carolina Gang
Congaree Flyers - Gaston, SC -  http://www.congareeflyer.com
www.coxengineforum.com

Offline Avaiojet

  • 22 supporter
  • Trade Count: (0)
  • Admiral
  • *
  • Posts: 7468
  • Just here for the fun of it also.
Re: Bellcranks, leadouts and sleeves
« Reply #3 on: October 14, 2014, 05:47:45 PM »
RR,

I don't know if using the brass tube wrap at the end has become old school or not. I've never used it. Even when it was pitched.

I never could understand that brass bend over on the bellcrank ends?

I use eyelets and SS bolts plus lock nuts. Simple as pie, just like doing leadout ends or flying wires.

Works for me.
« Last Edit: October 06, 2015, 04:03:41 PM by Avaiojet »
Trump Derangement Syndrome. TDS. 
Avaiojet Derangement Syndrome. ADS.
Amazing how ignorance can get in the way of the learning process.
If you're Trolled, you know you're doing something right.  Alpha Mike Foxtrot. "No one has ever made a difference by being like everyone else."  Marcus Cordeiro, The "Mark of Excellence," you will not be forgotten. "No amount of evidence will ever persuade an idiot."- Mark Twain. I look at the Forum as a place to contribute and make friends, some view it as a Realm where they could be King.   Proverb 11.9  "With his mouth the Godless destroys his neighbor..."  "Perhaps the greatest challenge in modeling is to build a competitive control line stunter that looks like a real airplane." David McCellan, 1980.

Offline Andrew Hathaway

  • Trade Count: (0)
  • Captain
  • *****
  • Posts: 805
Re: Bellcranks, leadouts and sleeves
« Reply #4 on: October 14, 2014, 06:37:34 PM »
Thread your leadout through the tube before you bend it.  I usually wrap mine around the small #1 X-acto handle.  When you've got a U shape, slip it through the hole in the bellcrank and carefully squeeze the ends til they meet, then wrap as usual.

Offline RknRusty

  • 2019 supporter
  • Trade Count: (0)
  • Admiral
  • *
  • Posts: 2689
    • My Tube channel
Re: Bellcranks, leadouts and sleeves
« Reply #5 on: October 14, 2014, 07:14:01 PM »
Hi Andrew. Yeah that sounds even easier, I'll try that.
Charles this is what kit bashing hacks like me do with mass produced bellcranks. But I believe it's more than adequate for the large planes Jonathan, the OP, is talking about too. The control surfaces on my Osprey and Yak-9 fall whichever way gravity pulls them while I hold the plane and rotate it. No smartassness intended, but they'll never see the thousands of flights the big dudes claim to fly on theirs. Fwiw, I did watch Sparky's video today about the bellcrank with bearings in the leadout ends. And he did mention that much of what we stunters do is overkill.
Rusty
DON'T PANIC!
Rusty Knowlton
... and never Ever think about how good you are at something...
while you're doing it!

Jackson Flyers Association (a.k.a. The Wildcat Rangers(C/L))- Fort Jackson, SC
Metrolina Control Line Society (MCLS) - Huntersville, NC - The Carolina Gang
Congaree Flyers - Gaston, SC -  http://www.congareeflyer.com
www.coxengineforum.com

Offline Avaiojet

  • 22 supporter
  • Trade Count: (0)
  • Admiral
  • *
  • Posts: 7468
  • Just here for the fun of it also.
Re: Bellcranks, leadouts and sleeves
« Reply #6 on: October 14, 2014, 07:21:12 PM »

RR,

I don't know about that "overkill."

I'm beginning to think there's good reason for everything they do.

Nothing wrong with a bit of fine tuning, or a lot of it.
« Last Edit: October 06, 2015, 04:04:12 PM by Avaiojet »
Trump Derangement Syndrome. TDS. 
Avaiojet Derangement Syndrome. ADS.
Amazing how ignorance can get in the way of the learning process.
If you're Trolled, you know you're doing something right.  Alpha Mike Foxtrot. "No one has ever made a difference by being like everyone else."  Marcus Cordeiro, The "Mark of Excellence," you will not be forgotten. "No amount of evidence will ever persuade an idiot."- Mark Twain. I look at the Forum as a place to contribute and make friends, some view it as a Realm where they could be King.   Proverb 11.9  "With his mouth the Godless destroys his neighbor..."  "Perhaps the greatest challenge in modeling is to build a competitive control line stunter that looks like a real airplane." David McCellan, 1980.

Offline Andrew Hathaway

  • Trade Count: (0)
  • Captain
  • *****
  • Posts: 805
Re: Bellcranks, leadouts and sleeves
« Reply #7 on: October 15, 2014, 10:56:53 AM »
Here's a great tutorial and it's head slapping easy.
http://www.stunthangar.com/uploads/bellcrank%201.pdf
Don't miss step#8 or it won't move as freely as it should.
Hope this helps.
Rusty

About the only parts of that PDF tutorial I agree with are bushing the lead outs, wrapping with copper wire, and covering with heatshrink tubing. 

- I would avoid putting a 90* bend in the tubing.  Part of what we're trying to do by bushing the cable, is to prevent stress risers and wear to the cable.  A better alternative is to bend the tube (and lead out wire) in a smooth, round bend, into a teardrop shape.  Any sharp bend will create a weak spot.  You don't want any sharp edges wearing against the cable.

- Since we're trying to eliminate places where the cable can flex and fail, I'd extend the heatshrink tubing.  By using a longer piece and extending it so it overlaps the brass tubing bushing, the flex point between the copper wrap, and the brass tubing can be minimized. 

- The "screen door post" shown in the PDF looks a lot like an aluminum binding post from the local hardware store.  I wouldn't trust an aluminum pivot.  While places like McMaster-Carr sell them in Stainless Steel, a piece of 1/8" music wire is probably better anyway.


Re: Overkill - It's not really overkill.  The smallest detail of a CL model done incorrectly can make the plane harder to fly smoothly and accurately.  Since CL aerobatics is judged on smoothness, and accuracy, attention to detail makes for a better flying plane and higher scores.  On a sport plane, it doesn't matter so much, but it's still a good idea to incorporate the technology and changes that the serious competitors have made, since it generally makes for a safer, more enjoyable to fly model.

The old Perfect bellcrank is a prime example of obsolete hardware.  It might have been barely adequate 50 years ago, in a Ringmaster that might not survive it's first afternoon at the neighborhood park.  But now, by modern standards, where we use more powerful modern engines and expect our models to last hundreds of flights, it's really not good for anything.  The aluminum is so soft it's easily bent.  If it survives a pull-test it won't likely survive a yank following a temporary loss of line tension.  If the model lasts very long any unbushed friction surfaces will wear out rapidly.  Using one is just asking to have a problem.

Offline Jonathan Chivers

  • Trade Count: (0)
  • Ensign
  • **
  • Posts: 47
Re: Bellcranks, leadouts and sleeves
« Reply #8 on: October 15, 2014, 01:47:28 PM »
Hello everyone,
thank you for your replies and I ended up following Rusty's PDF (I like pictures!). I have included a picture of my handy work for the bellcrank, its pivots and bearers. I am still adjusting the spacers. The brass spacer and pivot rod came with the bellcrank from Brodake, the white(ish) spacer is a piece of hard rubber from my scrap box.

Does anyone have a strong opinion on what material to use for spacers like this?

Thanks, Jonathan

Offline Jonathan Chivers

  • Trade Count: (0)
  • Ensign
  • **
  • Posts: 47
Re: Bellcranks, leadouts and sleeves
« Reply #9 on: October 15, 2014, 01:49:32 PM »
And now with the picture  ???

Offline Avaiojet

  • 22 supporter
  • Trade Count: (0)
  • Admiral
  • *
  • Posts: 7468
  • Just here for the fun of it also.
Re: Bellcranks, leadouts and sleeves
« Reply #10 on: October 15, 2014, 04:32:35 PM »
Perfect bellcranks are not as tempered as the Fox.

« Last Edit: October 06, 2015, 04:06:31 PM by Avaiojet »
Trump Derangement Syndrome. TDS. 
Avaiojet Derangement Syndrome. ADS.
Amazing how ignorance can get in the way of the learning process.
If you're Trolled, you know you're doing something right.  Alpha Mike Foxtrot. "No one has ever made a difference by being like everyone else."  Marcus Cordeiro, The "Mark of Excellence," you will not be forgotten. "No amount of evidence will ever persuade an idiot."- Mark Twain. I look at the Forum as a place to contribute and make friends, some view it as a Realm where they could be King.   Proverb 11.9  "With his mouth the Godless destroys his neighbor..."  "Perhaps the greatest challenge in modeling is to build a competitive control line stunter that looks like a real airplane." David McCellan, 1980.

Offline Clint Ormosen

  • 2019 supporter
  • Trade Count: (0)
  • Admiral
  • *
  • Posts: 2628
Re: Bellcranks, leadouts and sleeves
« Reply #11 on: October 15, 2014, 05:55:18 PM »
Andrew,

You're really knocking the product.

Perfect bellcranks were undergoing pull tests long before you were involved in modeling. The bellcrank in the top photo is older than you are. So is the wing.  LL~

Similar ones are currently being offered by Fox. I use Fox bellcranks.

Mine is doubled.

The model will come apart before the bellcrank bends.

And as long as it operates smoothly, it can be used in any model.

No reason why not.

Buy a couple and put them together. Put it between two pieces of plywood and do the test.

Then you can talk about the results.

P.S.

Andrew,

I dug this up just for you.

Fox large bellcrank. Of which BTW I use two.

Here's their description text.

"Quick Overview
Designed for use with control line models, the
Fox Bellcrank is formed from heavy-duty aluminum alloy sheet. It will stand
a pull test of 50 - 60 lbs., making it suitable for heavier scale models.
The non-binding center pivot will not bind the bellcrank when it is bolted
down tightly. It has three pushrod position holes.

3 3/8" long x 1 5/16" wide."


If you actually flew models you'd discover that the leadouts saw through a soft aluminum Perfect bellcrank in almost no time. Even solid wire leadouts wil do it. The Fox bellcranks aren't a whole lot better. Best not to use them at all.
-Clint-

AMA 559593
Finding new and innovated ways to screw up the pattern since 1993

Offline Avaiojet

  • 22 supporter
  • Trade Count: (0)
  • Admiral
  • *
  • Posts: 7468
  • Just here for the fun of it also.
Re: Bellcranks, leadouts and sleeves
« Reply #12 on: October 15, 2014, 06:18:58 PM »

If you actually flew models you'd discover that the leadouts saw through a soft aluminum Perfect bellcrank in almost no time. Even solid wire leadouts wil do it. The Fox bellcranks aren't a whole lot better. Best not to use them at all.

Clint,

Thanks for the reply.

You may be correct on that.

However, I have ss bolts and leadouts wraped around eyelets on the ends. No more wear and tear than eyelets on the end of leadouts.

Trump Derangement Syndrome. TDS. 
Avaiojet Derangement Syndrome. ADS.
Amazing how ignorance can get in the way of the learning process.
If you're Trolled, you know you're doing something right.  Alpha Mike Foxtrot. "No one has ever made a difference by being like everyone else."  Marcus Cordeiro, The "Mark of Excellence," you will not be forgotten. "No amount of evidence will ever persuade an idiot."- Mark Twain. I look at the Forum as a place to contribute and make friends, some view it as a Realm where they could be King.   Proverb 11.9  "With his mouth the Godless destroys his neighbor..."  "Perhaps the greatest challenge in modeling is to build a competitive control line stunter that looks like a real airplane." David McCellan, 1980.

Offline Clint Ormosen

  • 2019 supporter
  • Trade Count: (0)
  • Admiral
  • *
  • Posts: 2628
Re: Bellcranks, leadouts and sleeves
« Reply #13 on: October 15, 2014, 07:21:57 PM »
Clint,

Thanks for the reply.

You may be correct on that.

However, I have ss bolts and leadouts wraped around eyelets on the ends. No more wear and tear than eyelets on the end of leadouts.


Doesn't matter. At best you're slowing it down a little. The vibrations combined with friction eats through the soft metal in no time. Please stop advising fellow modelers to use this obsolete hardware. Doesn't matter how you put your ends together, the thin aluminum isn't up to the job for very long. Why would you advocate these products when there is vastly superior hardware available? Makes no sense.
-Clint-

AMA 559593
Finding new and innovated ways to screw up the pattern since 1993

Offline Andrew Hathaway

  • Trade Count: (0)
  • Captain
  • *****
  • Posts: 805
Re: Bellcranks, leadouts and sleeves
« Reply #14 on: October 15, 2014, 07:41:16 PM »
And now with the picture  ???

I'd give it a solid B.  The bends could be smoother, and you've still got a flex point between the copper wrap and the tubing bushing.  I'd also throw a washer on the bolt through the ball link, or flip the bolt over so the link can't pop off, but that's probably just a bit of healthy paranoia.  It'll probably work fine, assuming it's free to move smoothly.  If it sticks anywhere or has tension anywhere in the arc of motion, fix it.

Generally, I solder washers to the bellcrank post to center the bellcrank, and keep it from tilting, then after the plywood reinforcement is added top and bottom, I solder another washer to the post outside the plywood to keep the post centered in the wing.  That way no spacers are necessary.  This assumes you are on good terms with your soldering iron.

Andrew,

You're really knocking the product.

Perfect bellcranks were undergoing pull tests long before you were involved in modeling. The bellcrank in the top photo is older than you are. So is the wing.  LL~

Similar ones are currently being offered by Fox. I use Fox bellcranks.

Mine is doubled.

The model will come apart before the bellcrank bends.

And as long as it operates smoothly, it can be used in any model.

No reason why not.

Buy a couple and put them together. Put it between two pieces of plywood and do the test.

Then you can talk about the results.

P.S.

Andrew,

I dug this up just for you.

Fox large bellcrank. Of which BTW I use two.

Here's their description text.

"Quick Overview
Designed for use with control line models, the
Fox Bellcrank is formed from heavy-duty aluminum alloy sheet. It will stand
a pull test of 50 - 60 lbs., making it suitable for heavier scale models.
The non-binding center pivot will not bind the bellcrank when it is bolted
down tightly. It has three pushrod position holes.

3 3/8" long x 1 5/16" wide."

Of the fairly recent, common commercially available, ALUMINUM bellcranks, the Fox is probably the best.  It's at least made from a harder aluminum.  The Veco bellcranks are almost as good as a Fox, but softer, and the Perfect bellcranks are pure crap that belong in the nostalgia box or the garbage can if you can't fight the temptation to actually use one.  Well OK, I do have a Perfect bellcrank in my Bi-Slob, but that's a special circumstance where I can see the bellcrank any time I care to look at it, in a plane I fly rarely, and that I didn't expect to last more than a few trips to the flying field.  A Perfect bellcrank might be fine for a 1/2A, but then so would a bellcrank cut from decent plywood.

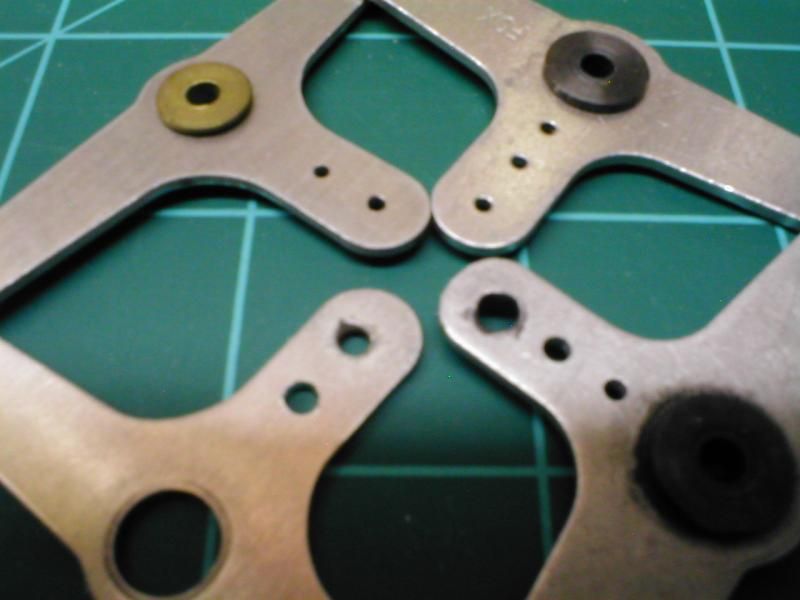
Back when I got my start in the hobby, we used Fox bellcranks almost exclusively.  When we started attending contests, I started piling up Perfect bellcranks from raffles.  As luck would have it, I happen to have 4 bellcranks laying around to illustrate the problem with aluminum bellcranks.  There's a brand new Fox 3" bellcrank, a new Perfect 3" bellcrank, a Fox 3" bellcrank from a box stock Fox 35 powered Flite Streak that survived two seasons, and a Perfect 3" bellcrank from a OS 25FP powered Flite Streak that lasted only a few flights.  I will call this set of pictures...

A Tale of Four Bellcranks - An Exercise in Medieval C/L Hardware.


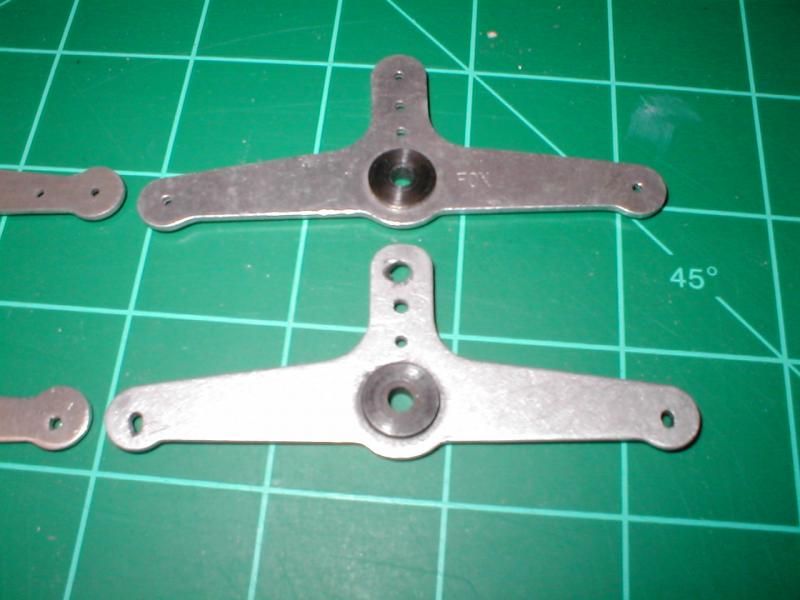
Here we have an establishing shot.  The bellcranks in the foreground are used, the bellcranks in the background are new old stock.  On the left are products from Perfect, on the right are parts from Fox MFG.


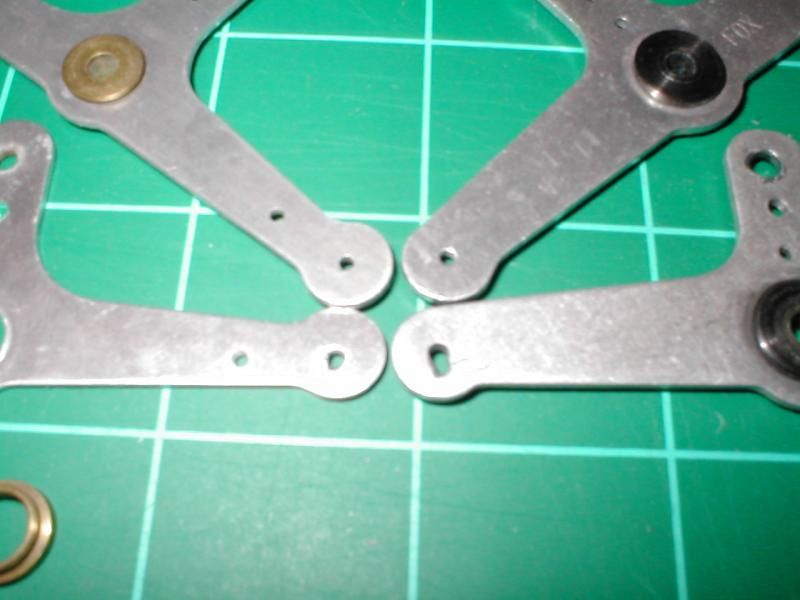
Here we see a close up image of two Fox 3" bellcranks.  As you can clearly see, the used Fox bellcrank in the foreground exhibits a dusting of dark powder around the bearing.  The powder tests consistent with what you'd find when examining aluminum worn from friction.  You can also see the lead out holes are egged out, in the direction of the center of the circle as it would be mounted in the plane.  Also, please note that the pushrod hole furthest from the pivot point is egged out from the pushrod wearing against the aluminum bellcrank.  It's also worth mentioning that the middle pushrod hole was drilled to fit the .078" pushrod wire when the model was built.  The outer hole that was eventually used is approximately twice the size that it was originally drilled when the model was built.  In conclusion, a Fox bellcrank used in a traditional manner will wear rapidly.


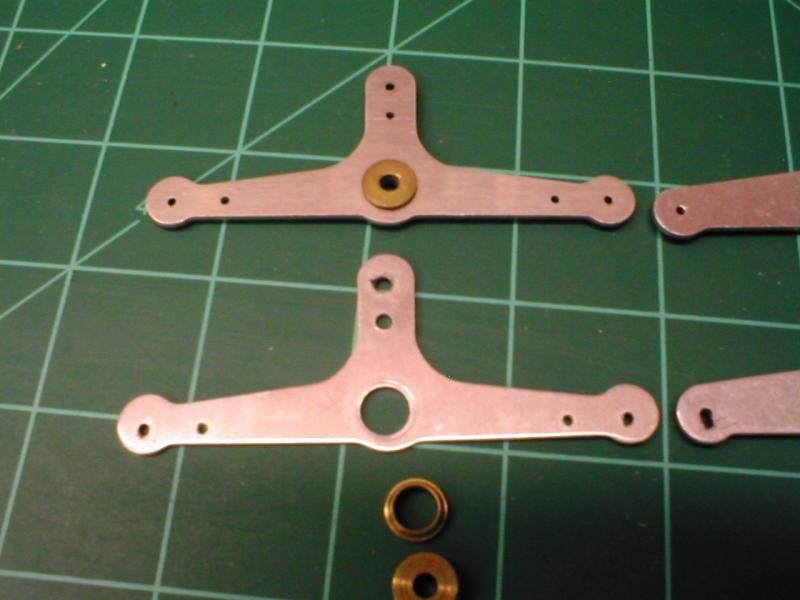
Here we have a close up image of two Perfect 3" bellcranks.  Please note that the brass bushing has popped out of the used bellcrank.  Also you will notice that both leadout holes show signs of egging out, and while it's hard to see in the image, the outer pushrod hole is worn oversize.  What we can conclude from this image is that a Perfect bellcrank used in a traditional manner will wear rapidly.  Keep in mind this bellcrank was only in the model for a few flights.


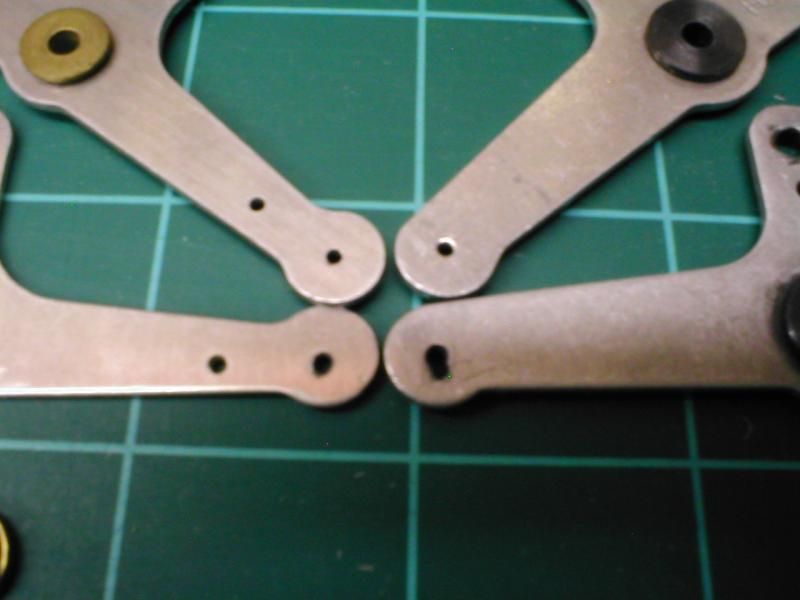
Images 4, 5, and 6 serve to demonstrate the hole wear between new and used bellcranks of both origin.


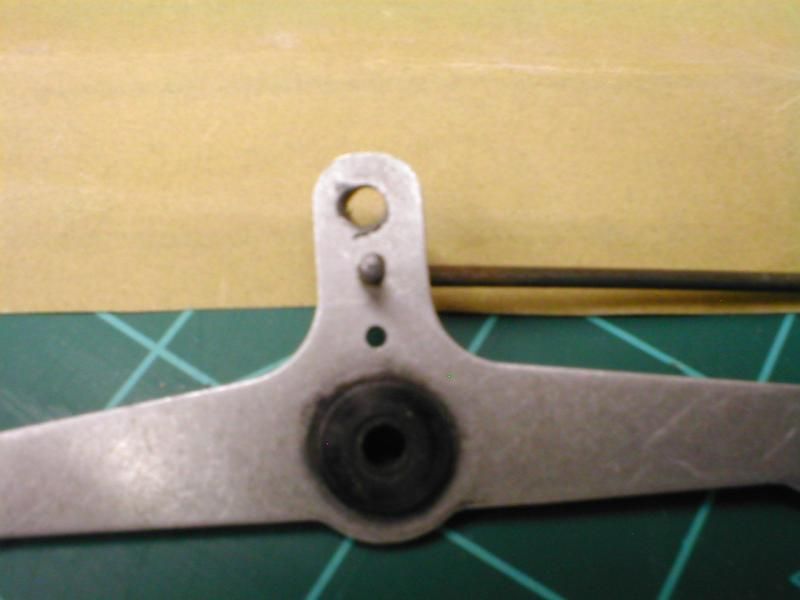
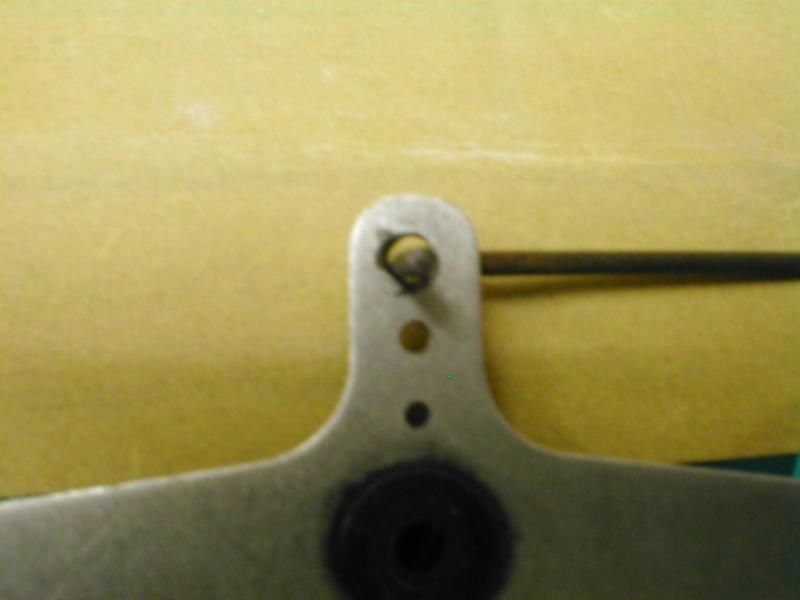
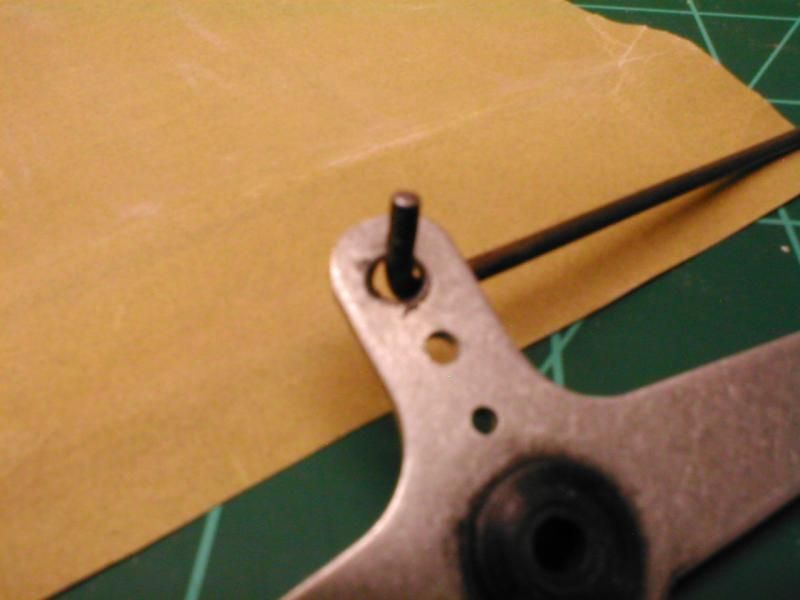
Images 7, 8, and 9 display a Fox 3" bellcrank and a Top Flite Flite Streak kit pushrod.  The purpose of these images is to demonstrate how dramatically the pushrod wore the bellcrank in a relatively short period of time.

Now about the time I stopped using Fox bellcranks, I started building Sig kits and using their nylon 3" bellcranks.  While I regret that I don't have any images of Sig bellcranks available to corroborate my story, they don't wear appreciably, at all when used in a traditional manner.  As a general guideline, I still bush the leadouts with tubing through the Sig bellcranks, and I tend to use 4-40 ball links at the pushrod end, but back when I made the switch, I did not take those precautions.  In fact the reason I don't have pictures of old used Sig bellcranks, is because I keep reusing them because they hardly ever show any signs of wear.  I've got a few that are so old, I'm starting to get concerned about the nylon turning brittle.  I get Sig bellcranks from http://www.mbsmodelsupply.com, 4 for $3.00.  List price on a Fox bellcrank is $8 each, and you need two of them?  ~^  Not to mention that Fox isn't making engines anymore, so can a person even get a Fox bellcrank?  I don't mean to R%%%%, I like Fox, but these are also the people that boasted their new ceramic Stunt .60 was so powerful it'd tear the wings off your plane.  As if that was a good thing.  For old tech, their bellcrank is as good as anyone's, and with the proper precautions they will probably have decent longevity, but there are better options available.

Offline Geoff Goodworth

  • Trade Count: (0)
  • Captain
  • *****
  • Posts: 808
Re: Bellcranks, leadouts and sleeves
« Reply #15 on: October 15, 2014, 10:47:16 PM »
I follow the tutorial that Rusty pointed us to using Brodak or SIG bellcranks. The one thing I do differently is use copper or aluminium tube instead of brass. I may be wrong but brass seems more brittle than the alternatives.

Offline Howard Rush

  • 22 supporter
  • Trade Count: (0)
  • Admiral
  • *
  • Posts: 7811
Re: Bellcranks, leadouts and sleeves
« Reply #16 on: October 16, 2014, 01:03:23 AM »
I'll go along with Andrew.  After folding a Perfect bellcrank or two on pull test, we learned to use Vecos (then Foxes).   Later Perfect bellcranks mention their alloy; Perfect may have mended their ways.  Sig nylon bellcranks do get brittle with age.  Give an old one a test bend before using it.  You're probably better off using a bigger bellcrank, though.
The Jive Combat Team
Making combat and stunt great again

Offline RknRusty

  • 2019 supporter
  • Trade Count: (0)
  • Admiral
  • *
  • Posts: 2689
    • My Tube channel
Re: Bellcranks, leadouts and sleeves
« Reply #17 on: October 16, 2014, 01:57:06 AM »
I also like Andrew's method of rounding the tube instead of the sharp bends. I'll make that change next time. Pretty soon I'll be rigging up my Oriental and it'll get that treatment. I'm still juggling whether to use the 3" or the 4" crank in it.
Rusry
DON'T PANIC!
Rusty Knowlton
... and never Ever think about how good you are at something...
while you're doing it!

Jackson Flyers Association (a.k.a. The Wildcat Rangers(C/L))- Fort Jackson, SC
Metrolina Control Line Society (MCLS) - Huntersville, NC - The Carolina Gang
Congaree Flyers - Gaston, SC -  http://www.congareeflyer.com
www.coxengineforum.com

Offline Jonathan Chivers

  • Trade Count: (0)
  • Ensign
  • **
  • Posts: 47
Re: Bellcranks, leadouts and sleeves
« Reply #18 on: October 16, 2014, 02:35:16 AM »
Hi Andrew,
given that 24 hours before I made the ones you see in the picture I did not know how to do this, I am very happy with a B!

Next time I will make sure I have brass (the copper needed to be heated before it would bend without a dangerous looking kink) and try for a smooth rounded end, rather than two 90 degree bends.

As for the soldering iron, I used to be okay while the solder had lead in it, but I am finding it a pain now it is lead free. Any tips or trick (or re-directs where this has already been covered)? I am curious as to what brand of solder and flux you are using.

Jonathan

Offline Jonathan Chivers

  • Trade Count: (0)
  • Ensign
  • **
  • Posts: 47
Re: Bellcranks, leadouts and sleeves
« Reply #19 on: October 16, 2014, 02:39:19 AM »
Hi again,
I asked Brodake about sleeving to protect the bellcrank from the leadout wires, here is there quote "Our bellcranks are made out of special nylon from DuPont. It self lubricates so you don’t have to worry about sleeves".

Given the number of kits and planes Brodake build and their presence in the stunt scene, this would seem to be a credible answer. Has anyone tried NOT sleeving their leadouts and using a Brodake bellcrank?

Jonathan

Offline Andrew Hathaway

  • Trade Count: (0)
  • Captain
  • *****
  • Posts: 805
Re: Bellcranks, leadouts and sleeves
« Reply #20 on: October 16, 2014, 07:45:30 AM »
As for the soldering iron, I used to be okay while the solder had lead in it, but I am finding it a pain now it is lead free. Any tips or trick (or re-directs where this has already been covered)? I am curious as to what brand of solder and flux you are using.

<snip>

I asked Brodake about sleeving to protect the bellcrank from the leadout wires, here is there quote "Our bellcranks are made out of special nylon from DuPont. It self lubricates so you don’t have to worry about sleeves".

Jonathan

Good electronics solder is available at Radio Shack.  I use the 60/40 variety that's about 1/16" diameter, it melts quickly and flows nicely.  The hardware store plumbing solder has never really worked well for me.  For flux, I've been using a water clean-up plumbing solder for several years.  I'd have to check the label.  The local Ace Hardware carries Nokorode paste flux, which makes a nice joint, but is a bit harder to clean up than the other stuff I've been using.

<edit ----

Here's the label on the Radio Shack solder I use, and a variety of fluxes.  My preference is the Alphametals Hydroflow, because it's easy to clean up.  Keep in mind this tub of flux is nearly 2 decades old, and it might not be the same product now, or even available anymore.  The Nokorode is a fair substitute, just takes a little more work to remove the flux after soldering.


----/edit>

Brodak isn't wrong, but they're also looking at the issue from a slightly different viewpoint.  Simply looping the leadout through a nylon bellcrank, is probably safe in most cases.  But what most of us are doing is going above and beyond the level of just buying a kit and assembling it.  We want a higher level of performance from the finished model, so we make substitutions where we feel necessary, to reach that goal.  Without bushings, the chance of a nylon bellcrank failure is minimal, however with bushings, we reduce the wear to a point where it's probably never going to be a problem.  Keep in mind that the bushings are to reduce the tendency of the cable to saw through the bellcrank, but also to give the cable the smoothest path without stress points that will wear the cable.  If the cable breaks, the result is just as bad as if the bellcrank is cut through.

<edit ----

Here's a couple more snapshots from the shop.  


This image shows how I normally mount bellcranks in larger models, this one was an ARF Nobler, from several years ago. If I were wrapping these leadouts now, I'd bend the brass tubing around an X-acto knife handle, then drill the leadout holes in the bellcrank as necessary to slip the U around the bellcrank, then squeeze the ends together.  Bending the tube inside the bellcrank tends to bind more, and it creates more stress spots on the cable, since it's hard to make a smooth bend around a square form.  I'd also slide the heatshrink tubing further onto the brass tubing to reduce the flex point between the tubing and copper wrap.


These two photos show how I generally try to bush my leadouts now.  The cable slips through the tubing, the tubing is bent around an X-acto handle, then the tubing/leadout is threaded through the bellcrank, the tubing ends are brought together and the leadout is wrapped.  This is before the heatshrink tubing is applied.  If you look closely you can probably see why I chose not to finish these leadouts and use this bellcrank.


This photo is to illustrate how I generally try to apply the heatshrink tubing now.  By bridging the joint from the copper wire wrap to the brass tubing, we're relieving the stress point between the two stiff sections that would normally flex, which should (theoretically anyway) prolong the life of the cable.  This is the line end of the leadout, but the principle is the same.


This last image is the same Sig 3" bellcrank pictured above.  This bellcrank most recently was in a Ringmaster I built in 1995 and flew until 2012.  It went about 300 flights in the Ringmaster, and I'm pretty sure it was in another Ringmaster before the 1995 plane.  Chances are above average that it was a salvaged bellcrank before ever being in a Ringmaster.  Up until I wrapped these leadouts in preparation for Ringmaster #3, the leadouts weren't bushed, and the pushrod was the classic style music wire pushrod with a 90* bend and soldered washer.  The wear in the leadout holes was minimal, it was removed completely drilling the bellcrank for 1/16" brass tube bushings.  The pushrod hole wear is minimal as well, the visible discoloration is from overheating the nylon while soldering the washer, as it was soldered before I started using the solder I show above.  The reason I chose not to reuse this bellcrank a 3rd time, was because it has a noticeable curve in the nylon.  While it would probably be fine, the control system was not a place where I wanted to try to save a buck by reusing a nearly 20 year old bellcrank.


----/edit>


« Last Edit: October 16, 2014, 09:32:05 AM by Andrew Hathaway »

Offline John Eyer

  • Trade Count: (0)
  • Ensign
  • **
  • Posts: 39
Re: Bellcranks, leadouts and sleeves
« Reply #21 on: October 16, 2014, 10:12:03 AM »
I use a modified bike chain link connection to bellcrank.   Simple, cheap and strong. 

Offline Randy Powell

  • 21 supporter
  • Trade Count: (0)
  • Admiral
  • *
  • Posts: 10478
  • TreeTop Flyer
Re: Bellcranks, leadouts and sleeves
« Reply #22 on: October 16, 2014, 11:41:30 AM »
Well, that's clever.
Member in good standing of P.I.S.T
(Politically Incorrect Stunt Team)
AMA 67711
 Randy Powell

Offline RC Storick

  • Forum owner
  • Administrator
  • Trade Count: (0)
  • Admiral
  • *
  • Posts: 12408
  • The finish starts with the first piece of wood cut
    • Stunt Hangar
Re: Bellcranks, leadouts and sleeves
« Reply #23 on: October 16, 2014, 03:24:17 PM »
Aluminum bell cranks do work and they will last but I have yet to see one bushed like I do them (all old school). I moved from aluminum to phoenolic and when Brett's bell crank came out I knew it was better. Anyone can use anything they wish but I always look for the best way to do things and until something else comes along I will use Brett's. I wish I could get Dan Winship's  but even those need to really have the line ends like Brett's.
AMA 12366

Offline Howard Rush

  • 22 supporter
  • Trade Count: (0)
  • Admiral
  • *
  • Posts: 7811
Re: Bellcranks, leadouts and sleeves
« Reply #24 on: October 21, 2014, 12:00:46 AM »
Unbushed leadouts will saw through nylon bellcranks.
The Jive Combat Team
Making combat and stunt great again

Online Dan McEntee

  • 23 supporter
  • Trade Count: (0)
  • Admiral
  • *
  • Posts: 6856
Re: Bellcranks, leadouts and sleeves
« Reply #25 on: October 21, 2014, 01:24:47 AM »
Unbushed leadouts will saw through nylon bellcranks.
   I have seen that happen, and I have seen it happen the other way also. My son Sean was flying in Junior at the NATS and had the up lead out break at the bell crank. It was the C-D Lead out cable the Pylon sells, and the loop through the bellcrank broke on the up line, The model was a modified Twister with an FP-40 in it and was maybe a year old. The crash happened in the first round, and Sean had a back up airplane, an exact copy of the first model he finished right before we left for Muncie. He wanted to build something else like a Chipmunk, but I made him to another Twister, just like his first one. As he sat there looking at the carnage, I asked him what he thought HE should do. He said " pull the engine and tank from this one, mount it in the new one and get it trimmed  out." I said "Right answer!" We went over to the grass circles, and in about three flights we had it flying pretty nice, just like the first one. Took the sting out of losing the first model a little bit. I have pictures of it all. He always thought that the NATS was a big week long part, which I guess for some guys it is! But it can also be a lot of work and he found that out that year! I bush even nylon bell cranks after that incident. It may have just been because the loop was too tight, I don't know, but when you are at the bell crank installation stage, why cut corners?
   Type at you later,
    Dan McEntee
AMA 28784
EAA  1038824
AMA 480405 (American Motorcyclist Association)

Offline Garf

  • Trade Count: (0)
  • Admiral
  • ******
  • Posts: 1817
    • Hangar Flying
Re: Bellcranks, leadouts and sleeves
« Reply #26 on: October 30, 2014, 02:46:37 PM »
An early NoblARF I have has wire clips like fishing snaps to join the bellcrank to the leadouts. It looks like a good idea. The solid wire doesn't wear the bellcrank as bad as the stranded leadouts. I used a ball end on the pushrod end.

Offline afml

  • 24 supporter
  • Trade Count: (0)
  • Captain
  • *
  • Posts: 537
Re: Bellcranks, leadouts and sleeves
« Reply #27 on: October 30, 2014, 04:26:58 PM »
"when Brett's bell crank came out I knew it was better."

I'll second that!! #^
Available from Tom Morris.
"Tight Lines!" H^^
Wes
Wes Eakin

Offline Howard Rush

  • 22 supporter
  • Trade Count: (0)
  • Admiral
  • *
  • Posts: 7811
Re: Bellcranks, leadouts and sleeves
« Reply #28 on: October 30, 2014, 04:58:24 PM »
   I have seen that happen, and I have seen it happen the other way also. My son Sean was flying in Junior at the NATS and had the up lead out break at the bell crank. It was the C-D Lead out cable the Pylon sells, and the loop through the bellcrank broke on the up line, The model was a modified Twister with an FP-40 in it and was maybe a year old. The crash happened in the first round, and Sean had a back up airplane, an exact copy of the first model he finished right before we left for Muncie. He wanted to build something else like a Chipmunk, but I made him to another Twister, just like his first one. As he sat there looking at the carnage, I asked him what he thought HE should do. He said " pull the engine and tank from this one, mount it in the new one and get it trimmed  out." I said "Right answer!" We went over to the grass circles, and in about three flights we had it flying pretty nice, just like the first one. Took the sting out of losing the first model a little bit. I have pictures of it all. He always thought that the NATS was a big week long part, which I guess for some guys it is! But it can also be a lot of work and he found that out that year! I bush even nylon bell cranks after that incident. It may have just been because the loop was too tight, I don't know, but when you are at the bell crank installation stage, why cut corners?

Yep.  If the leadout is sticky in the bellcrank or bumps on structure, the cable can flex and fatigue.  I've been lucky.  I was flying and thought I hit a bug with my lines.  Peculiarly, it made a handle bias change.  Investigation showed the situation in the picture below.  It still scares me to hit a bug with my lines, but probably not as much as it scares the bug.
The Jive Combat Team
Making combat and stunt great again

Offline Curare

  • 2014 Supporters
  • Trade Count: (0)
  • Captain
  • *
  • Posts: 779
Re: Bellcranks, leadouts and sleeves
« Reply #29 on: October 30, 2014, 09:09:54 PM »
Wow that must have been some bug!

I does make me wonder, we all seem to have this flexural fatigue issue with terminations. Is there any way to go from stiff, to less stiff to line? As it is now we all seem to go from stiff to line in one big step.
Greg Kowalski
AUS 36694

Online Lauri Malila

  • Trade Count: (0)
  • Admiral
  • ******
  • Posts: 1632
Re: Bellcranks, leadouts and sleeves
« Reply #30 on: October 30, 2014, 11:22:49 PM »
Yes there is, you could for example use Kevlar & cyano instead of copper wire for wrapping.
I have never understood the meaning of that kind of wrapping like in Howards picture. Everything in it calls for fatigue. And if you ask Igor, also galvanic corrosion.
It is 2014 now, copper is no longer the strongest material for reinforcements:)

Lauri

Now where did that picture come from? I have no idea.

Offline Howard Rush

  • 22 supporter
  • Trade Count: (0)
  • Admiral
  • *
  • Posts: 7811
Re: Bellcranks, leadouts and sleeves
« Reply #31 on: November 03, 2014, 08:40:17 PM »
It is 2014 now, copper is no longer the strongest material for reinforcements

It is?  I'm so far behind.
The Jive Combat Team
Making combat and stunt great again

Offline Curare

  • 2014 Supporters
  • Trade Count: (0)
  • Captain
  • *
  • Posts: 779
Re: Bellcranks, leadouts and sleeves
« Reply #32 on: November 04, 2014, 09:27:29 PM »
Lauri, I understand what you're saying, but is CA really the best 'fix' for the kevlar threads? It's brittle, and is prone to cracking (and cracking right off Kevlar, nothing seems to soak it). Surely a sheath of epoxy would be more flexible/durable than CA?
Greg Kowalski
AUS 36694

Online Lauri Malila

  • Trade Count: (0)
  • Admiral
  • ******
  • Posts: 1632
Re: Bellcranks, leadouts and sleeves
« Reply #33 on: November 04, 2014, 11:41:12 PM »
No, there is no real risk for that. If you are really worried, there are allways flexible cyano's available.
You just impregnate the fibers with glue, not more. In such a thin layer the brittleness is not really an issue.
But Of course epoxy can be used but cyano is quicker. And cyano can be dissolved away with acetone or nitro, in case I need to re-use the eyelet.
If you use the search, there is a better explanation with pictures somewhere.

L

Offline Larry Borden

  • 24 supporter
  • Trade Count: (0)
  • Commander
  • *
  • Posts: 153
Re: Bellcranks, leadouts and sleeves
« Reply #34 on: November 29, 2014, 09:01:11 PM »
WOW! I'm way behind. Still using solid lead outs and Fox bellcranks. Still works for me.


Advertise Here
Tags:


Advertise Here